

Self Promotion Ideas For Graphic Designers
Self promotion on a budget
In the age of super-fast communication it has become increasingly easy for designers to ply their wares through an endless number of digital avenues. It's not enough to simply have an online portfolio; designers are now expected to be masters of marketing - not only emailing potential clients but also tweeting, posting on Facebook, using LinkedIn and any number of 'oh-so-now' social media tools in an effort to get their work noticed.
As effective as these methods can be if used correctly, often the recipient can be left feeling cold or, worse, irritated. Savvy designers have realised that often the best way to really grab an art director or potential employer's attention is with a beautiful, well-targeted piece of print work that they can actually hold in their hands.
The main drawback of this approach is that the cost can be exorbitant, with even professional digital printing often running into the hundreds for short runs. Through this hands-on tutorial I'll show you how, with a little imagination and design know how, it's possible to produce an effective mail-out on a limited budget, utilising different paper stocks and basic printing.
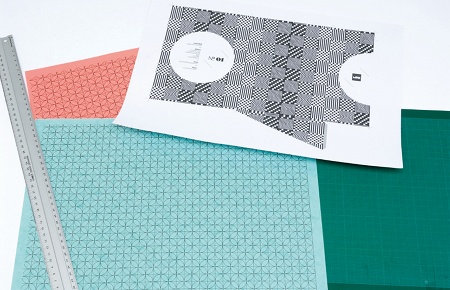
Materials
Variety of coloured card
Cutting mat
Knife Photocopier or inkjet printer
Double-sided sticky tape

01 To begin with we want to create the pattern that will form the 'lining' of our folder. Launch Illustrator, select the Pen tool and, ensuring that Snap To Grid is selected, begin to plot a simple right angle shape with a curved outer edge.
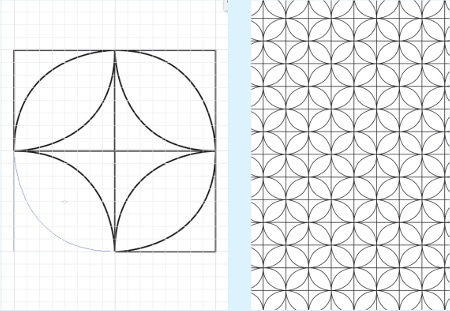
02 Now simply duplicate the shape by dragging it while holding Alt/Opt and then rotate it until you've filled out a single square tile, as shown. Group the objects together (Ctrl/Cmd+G) and, holding Alt/Opt, drag the tile across to copy it. Then simply hit Ctrl/Cmd+D to duplicate the tiles as many times as you like. Save this file as a separate document and we'll come back to it later.
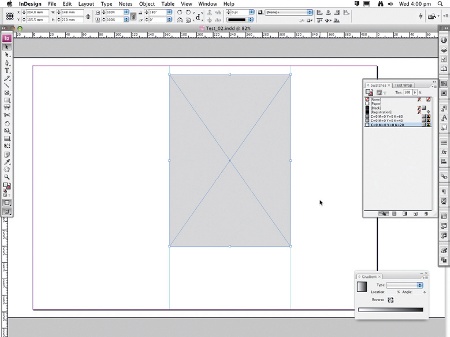
03 Move on to the template. As we want to keep costs down, the whole thing is going to have to fit onto an A3 sheet. Launch InDesign and set up a new A3 landscape document with no margins. Draw a box using the Rectangle tool and enter W: 148mm and H: 210mm (A5) for its dimensions. Using the Reference Point tool and X Location, drag and snap guides to either side of your rectangle.
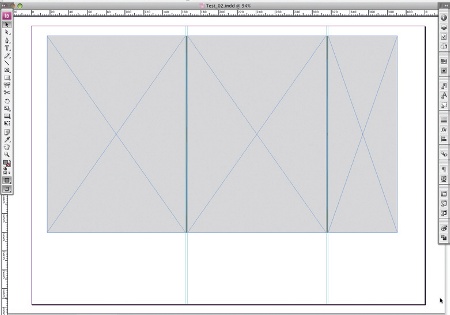
04 Drag your rectangle, holding Alt/Opt to duplicate it. Resize it to 2mm width, duplicate it again and snap the rectangles to either side of our original shape, setting up guides as we go. Duplicate our original A5 rectangle and snap it to the left side, then do the same on the right side but with a width of 74mm. The width of the sides is determined by the width of the prints that the folder will hold, so may vary depending on the weight of paper.
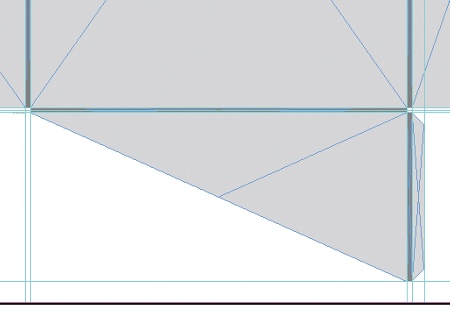
05 To create the flap that will hold our prints in place, simply draw a triangle that is no wider than 148mm and ensure that you allow for the 2mm depth of the folder. Add a small tab on the side that we'll use to glue the flap and also draw in some cutting and folding guides for use later.
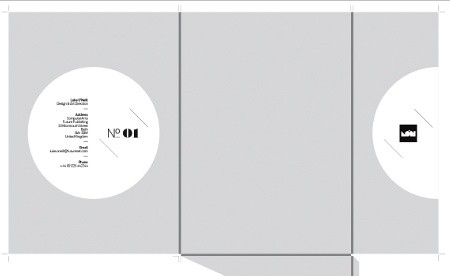
06 After our basic template has been created, it's time to add some design elements. Draw a circle on the far left pane of our template and add a semi-circle on the right-hand pane, ensuring that it's positioned exactly so that it will line up once the folder is closed. Add any text or information that you may wish to include. In this case I've simply added my logo, the issue number and my contact details that will appear under the front cover flap.
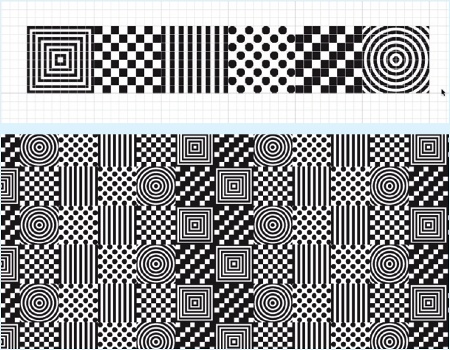
07 Creating the pattern for the outside comes next. This is done in much the same way as the one we made earlier, except I want a much bolder print. With Snap To Grid selected again, draw some graphic shapes, creating four or five tiles that can then be repeated. I've chosen to keep the shapes simple but feel free to experiment with your own style.
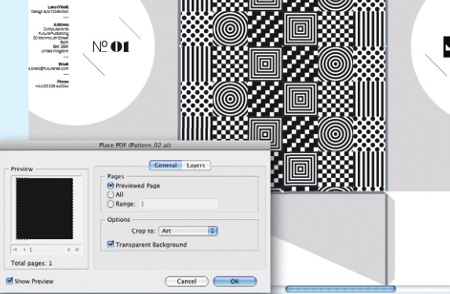
08 Back in InDesign, select the central pane of our folder and hit Ctrl/ Cmd+D to place our pattern image. Select Show Import Options and make sure that Crop To Art is selected. Once the pattern has imported, resize it until you're happy with the positioning of the tiles, and hit Centre Content.
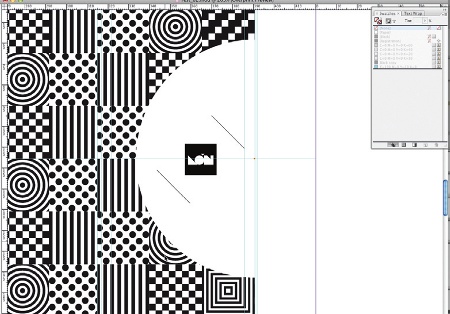
09 Repeat this process for the rest of the folder, dropping the pattern into all the remaining panes and sides of our folder. For the far right-hand pane that will form the front flap, rather than simply centring it you must ensure that the centre point of the pattern lines up with the right-hand edge so that it will match up properly once the folder is finally constructed.
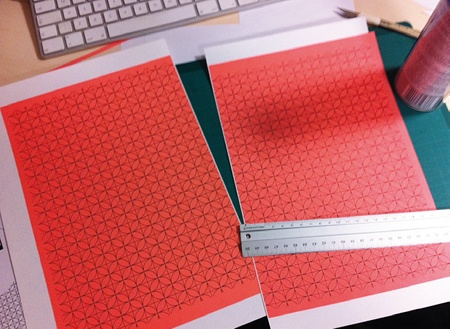
10 Visit your local art supplier and choose a variety of paper stocks in different colours, textures and weights. On a separate A3 document in InDesign, drop our original pattern image onto the page from Steps 1 and 2, and print this out onto one side, then feed the paper back through, printing the front of our folder on the other side. Some trial and error will be required, so you may want to print a few test pieces first.
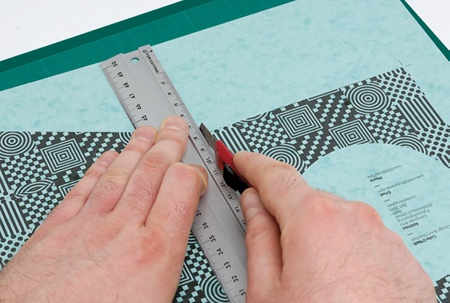
11 Now for the fiddly part. Very carefully score along our fold lines with a sharp blade and straight edge, exercising some restraint as we don't want to cut straight through. Following our crop guides, cut out the rest of the folder and then carefully create the folds along the score lines. You may wish to push your ruler flush against the score lines and bend the card back over the ruler to ensure maximum accuracy.
12 For the prints that will feature inside the folder, I choose to print them in full colour on a normal desktop ink-jet printer and then simply spray-mount the graphic pattern onto the back on a different colour stock. Little touches like this will help to maintain consistency across the whole folder and add to the overall effect.
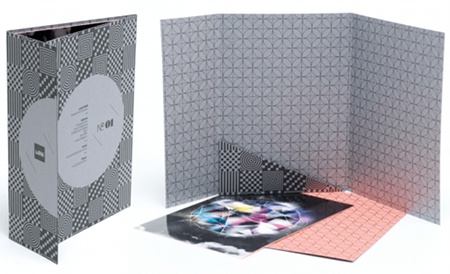
13 All that's left to do is assemble our folder by using a thin strip of double-sided tape along the tab that attaches the triangular flap to the main folder. Glue could be used here but I personally prefer tape as it avoids getting any sticky residue on the folder. And that's it!
Luke O'Neill
Deputy art editor of Computer Arts, Luke is a graphic designer and illustrator able to turn his hand to anything from complex layouts to illustrations and branding projects. He is currently broadening his skill set by working on the design of Computer Arts' next must-have iPad application.
Related articles
Self Promotion Ideas For Graphic Designers
Source: https://www.creativebloq.com/computer-arts/self-promotion-budget-2118698
Posted by: rodriguezwiterestich.blogspot.com
0 Response to "Self Promotion Ideas For Graphic Designers"
Post a Comment